
November 2026 update. The Phalcon, Vue, and webpack examples below document an integration approach from an earlier Antsand build. I am keeping them because working through real code is more useful than pretending the old stack never existed. For the blog pages I build now, the server renders the HTML and CSS and a small vanilla JavaScript module handles interaction. Antsand still has legacy Vue screens in its editing tools; this example records the earlier approach rather than claiming Vue vanished everywhere. They are not a prescription for every new page.
Today I first ask whether server-rendered HTML and CSS can do the job. When a page genuinely needs client-side interaction, I give the JavaScript a small responsibility and a documented API contract. That boundary makes it easier to test the page, trace failures, and reuse a component on another generated site. Check framework versions before copying any command from the historical examples.
Do you want to see how I connected PHP/Phalcon and Vue in a working example, rather than only read about the idea? If you have worked on php phalcon and worked a bit on vue.js as individual projects and now feel the need to link these frameworks together, this article is for you.
You might have gone to the official vue-webpack git page and followed the steps. After getting started with Vue, the next question is how it gets a place on a Phalcon-rendered page.
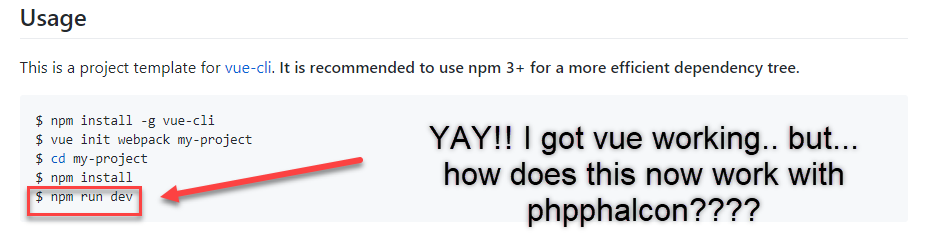
In my previous articles I wrote more on the theory of how these frameworks work. In this article I will show you how to:
a. Structure your php phalcon project
b. How to structure your *.vue files
c. How to configure webpack, and package.json file to build JavaScript from *.vue files
d. How to make a simple "hello world ecommerce" application using these frameworks
My job at the end of this article, is to help you, to be a better designer of your applications. I want to show the decisions behind the setup, not only a command that happens to work once.I may not answer every framework-version question, but I want the boundary between the tools to make sense. Let us get started connecting the dots.
On the other hand, This article is not a how to guide on webpack or how node and package.json work. Neither are we going to touch on what is php-phalcon or how vue.js works. A basic understanding of PHP/Phalcon and Vue will help. Please read the official documentation. You do not need to know webpack or node.js to get the most out of this article either. Also, we will not be talking about css. The css design is beyond the scope of this article.
Few rules to keep in mind before we get started: For more on the theory check this article out.
1. php is server code complied to HTML. (So fundamental, yet many ask questions related to this core concept.)
2. In this build, *.vue single-file components are compiled into JavaScript and CSS assets. React and Angular use different component formats.
3. webpack and the Vue build tooling compile the component files for the browser
I emphasis the rules, because if the rules are very clear and understood deeply, this article really has no value. You can literally create what you want by reading the official documentation of the frameworks. Hence, it is my goal to help you to think right and be a better designer of your applications.
1. The application
What are we going to build?
The aim of this application is to make an eCommerce website where php Phalcon and vue.js users can buy stunning website templates. I like to have grand ideas. It makes the project more real.
In this tutorial, we will be focusing on a small part of this eCommerce application. We will try to populate a few website templates as image thumbnails using vue.js + phpphalcon. It is good to decide in the beginning what part of the html we want PHP Phalcon to control and which part of the HTML, vue should take control. A little planning can go a long way.
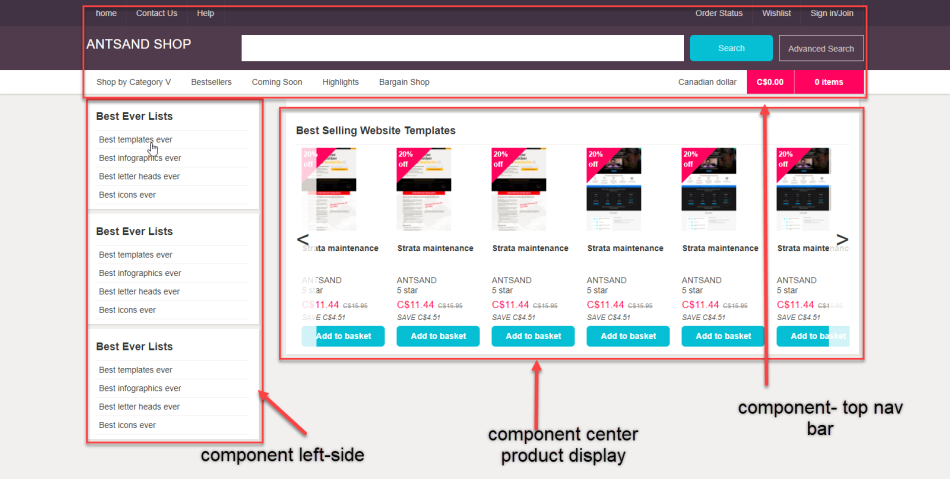
Let us divide the application into three sections. Accordingly we can plan out the vue components.
1. The nav bar at the top
2. The center product display
3. The left side bar
For this article, let us focus on just the center product display section. Our goal is to make vue.js control this section and populate the details.
We will demonstrate:
1. How the website should be designed - the code structure the controller and actions in php-phalcon and how to design data objects.
2. How php phalcon will give vue.js control to manipulate dom objects
3. How vue.js will take control and populate the Center product display (Best selling website templates section)
4. How the data is passed from vue to phalcon using AJAX and JSON objects. (More on this in the next article)
2. The folder structure
Now that we have a high level overview of what we are going to build, let us go right into designing the folder structure.
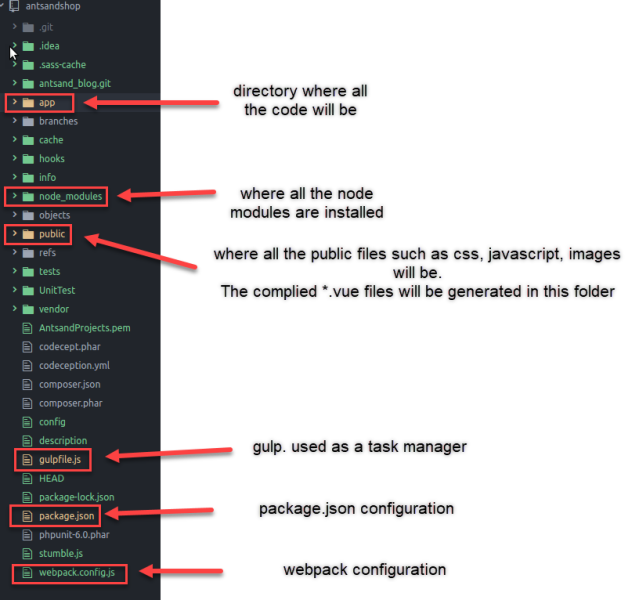
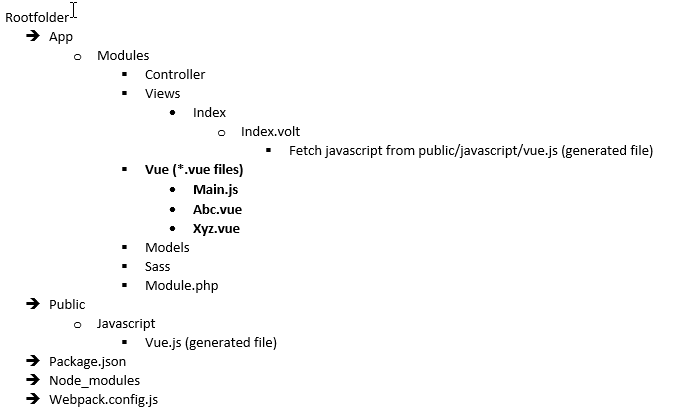
The above picture shows the root level folder structure of the whole application. Let us describe each of these directories in detail.
1. The app folder is where all our code is going to be written in. This is the directory where all our modification and code changes is going to happen.
2. The node_modules is where all the node installs are going to be. When you do an npm install
3. The public directory is where the web server can access all public files of our application. This is the folder where your index.php file resides, where your public images, css and javascript too reside. Our job is to make sure all *.vue files are compiled into javascript files and they are placed in this directory.
4. The package.json and webpack.config.js files are placed in the root directory.
The next question you may have is, where should we place the *.vue files? Let us dive deep into the "app" folder.
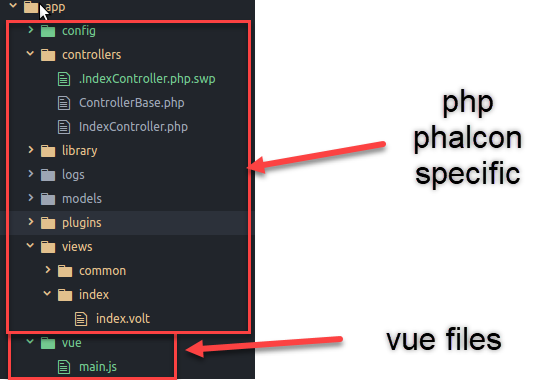
Have a directory called vue inside the phalcon main (app) folder. Our goal is to keep all files in one location. You don't want to have vue files in some outside directory, and then try to merge them together. There is a reason behind the madness.
1. You will have a hard time maintaining your vue files. As the project grows, you may lose track of which Vue file belongs to which PHP view or controller action.
2. You will have a messy and an unmaintainable folder structure.
As a rule of thumb. Structure your code, based on the application and NOT on the programming language and frameworks.
The languages and frameworks will keep changing, but the goal of your applications and sub-applications should always be the focus.
Projects can become hard to navigate when they are organized only around the framework rather than the feature. Look at your application holistically. What is the goal of your application and from there reverse engineer the structure of your server code and front end code.
Our goal at this stage is not to wonder how webpack or node will work. Our goal is to have a good code directory structure, so that we can work more effectively.
The end goal is to tell webpack to search in the app/vue folder and find the main vue files. Compile this file and all the vue components into the public folder. We then tell index.volt to look for this generated javascript file in the public folder.
If you have multiple sub-features in your application, then in php-phalcon you would want to have Modules. In this case, your code structure would be something like this:
3. Configuring Vue
I bet you have come to read this article just for this section. How the heck do we configure vue to work? Here we go.
Some guidelines:
1. All configuration files will be in the root folder. Not public folder or any other folder. (webpack, package.json, gulp, etc)
2. All generated and public files will be in the public folder
3. All codes irrespective of the languages will be in the app folder
You may have a different code structure based on your application. But this is the structure we will be following in this article.
Step 1: Install the right dependencies
We need to have webpack, babel, vue-loader
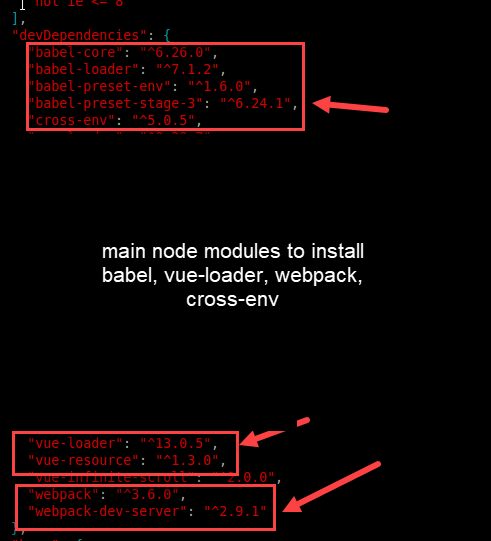
This is my full package.json configuration file for this application.
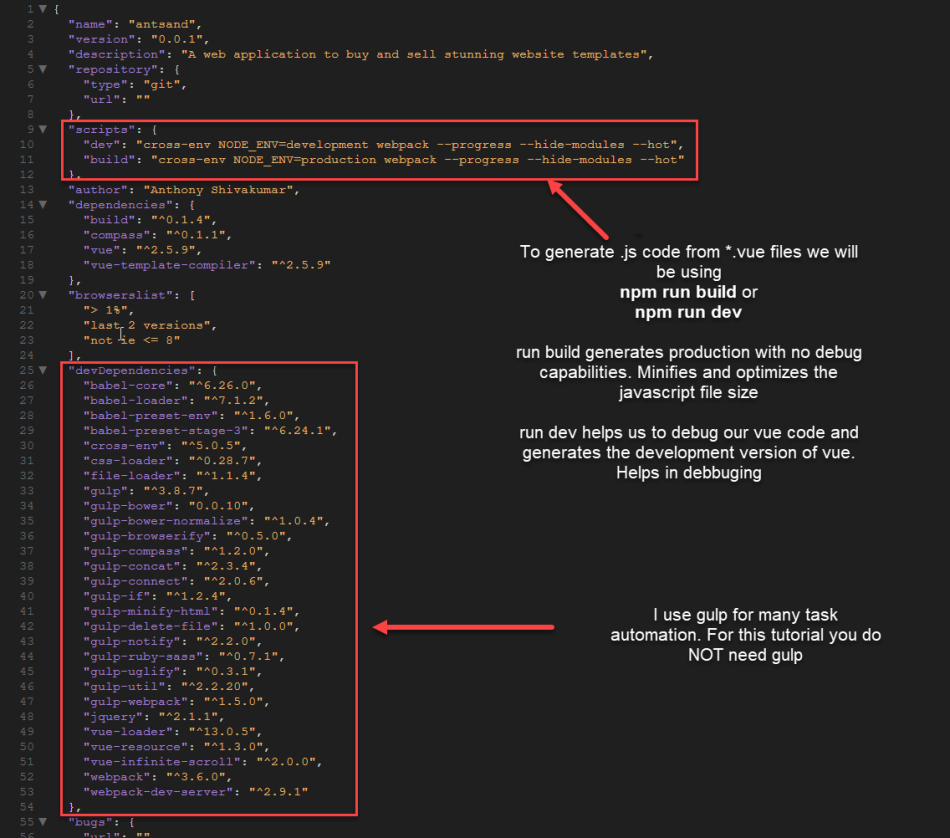
After you have this file, you can do an npm install. npm will read this package.json file and automatically install all the dependencies in the node_modules folder.
At the time, this installed webpack, vue-resource, gulp, and the other dependencies declared by the example. Check the versions before using this historical setup.
Step 2: Configure webpack: webpack.config.js
a. Tell webpack where to find the file
b. Tell webpack where to generate the vue files.
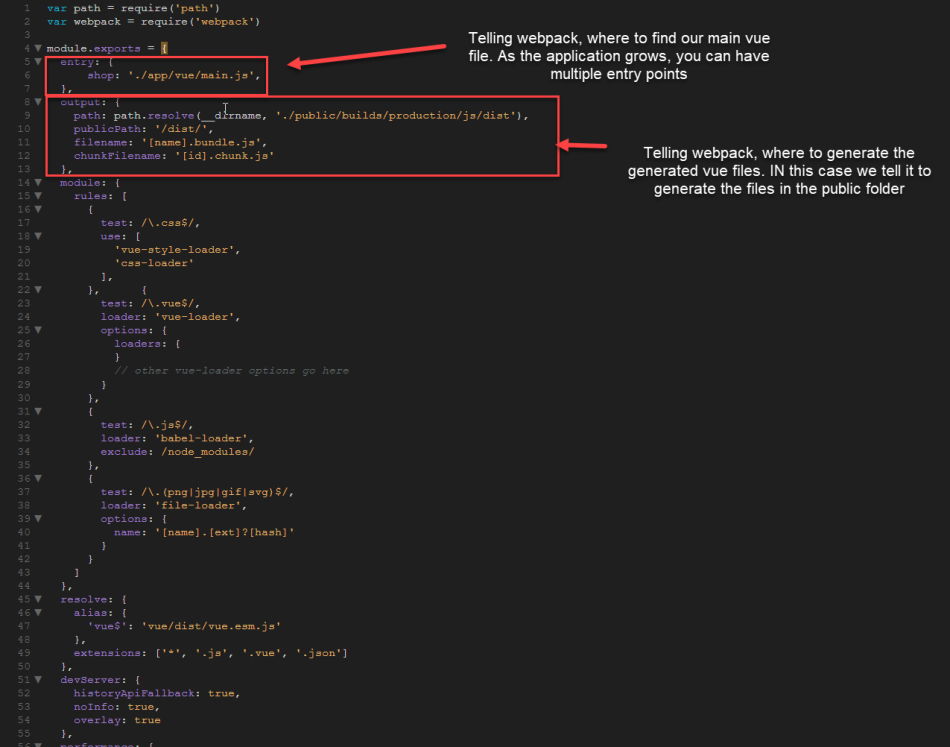
Step3: Configure Vue
Our goal in this step is to make sure that when we execute the build script with npm run build, it reads our Vue components and writes assets to the expected directory.
in the vue folder, create a file called main.js. The below picture should explain the details.
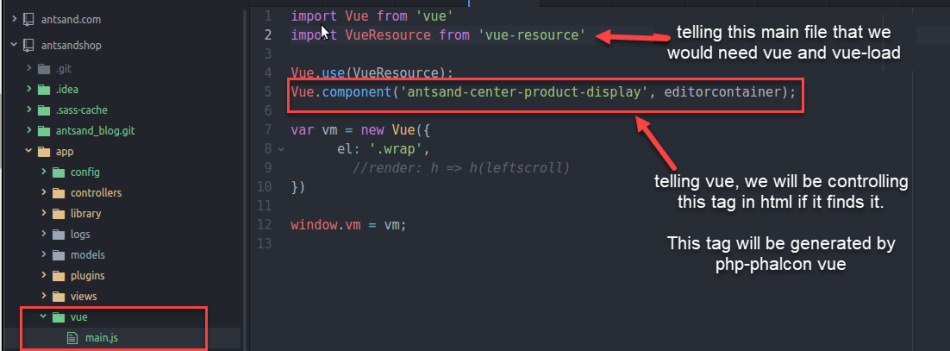
Let us test to see if webpack can read our vue file and generate it in the right directory.
After running npm run dev ( which is defined in our package.json file), webpack is able to read our file and generate our shop.bundle.js. We defined how to name our .js file in webpack.config.js under the output->filename tag. Also we named our entry "shop" that is where it gets the name shop.bundle.js.
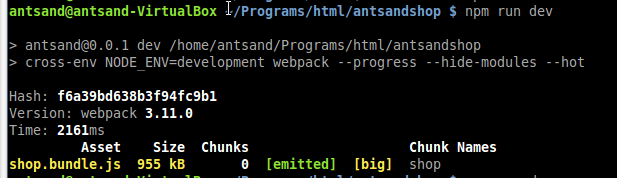
We now got everything working.
Step 4: Working With Phalcon
3 things needs to be defined in your index.volt file
a. Define the class or id which vue can control. In our case we called our class ".wrap"
b. Define the element vue will take control and populate it
c. Define in index.volt where to find the generated javascript file
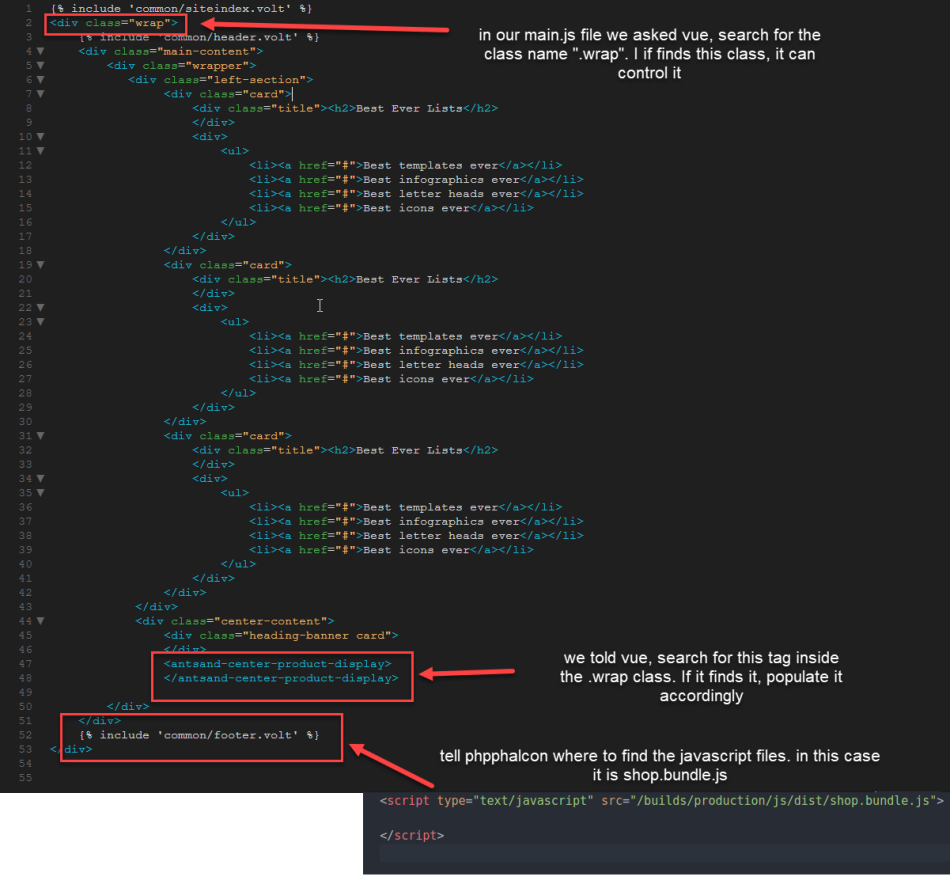
Vue.js now has full access to controlling your phpphalcon views.
Step5: Configuring vue and finisinhing up
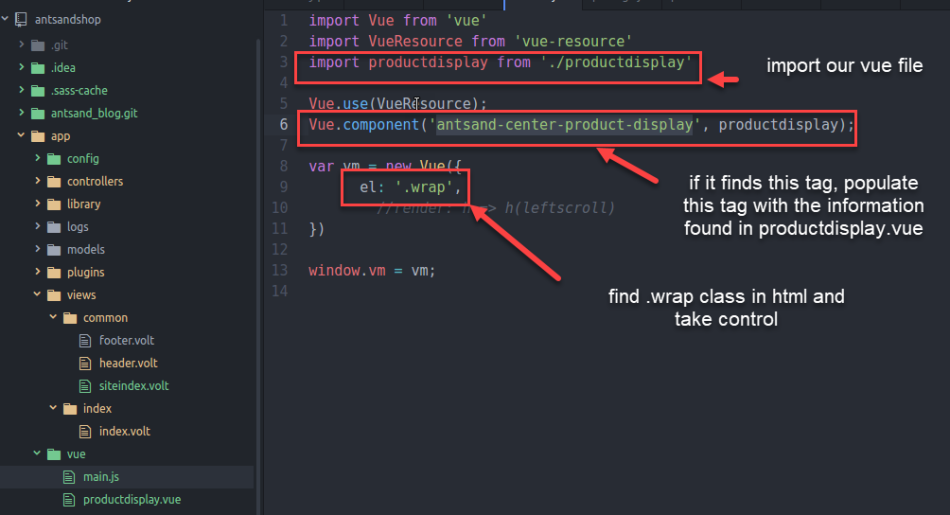
We create a file in the vue directory called productdisplay.vue. This file will have the logic on how to populate the
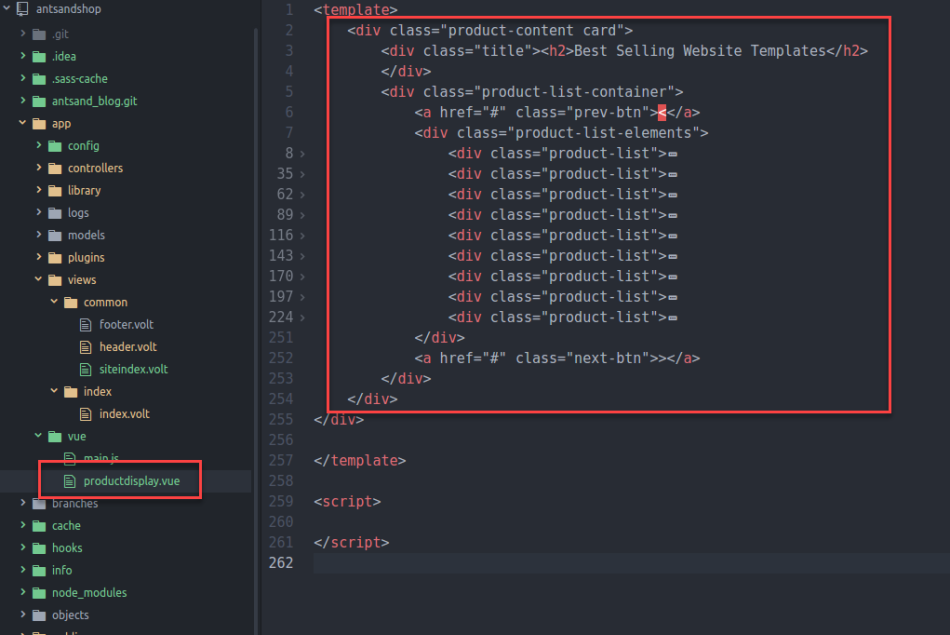
in the main.js file, we need to import this *.vue file.
Step 6: Run our build and lets test it out.
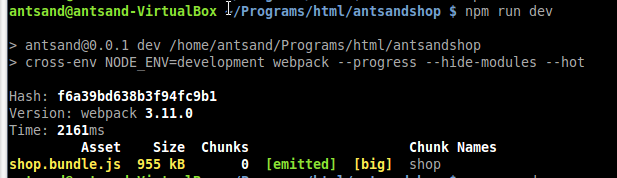
a. Run our build using npm run dev.
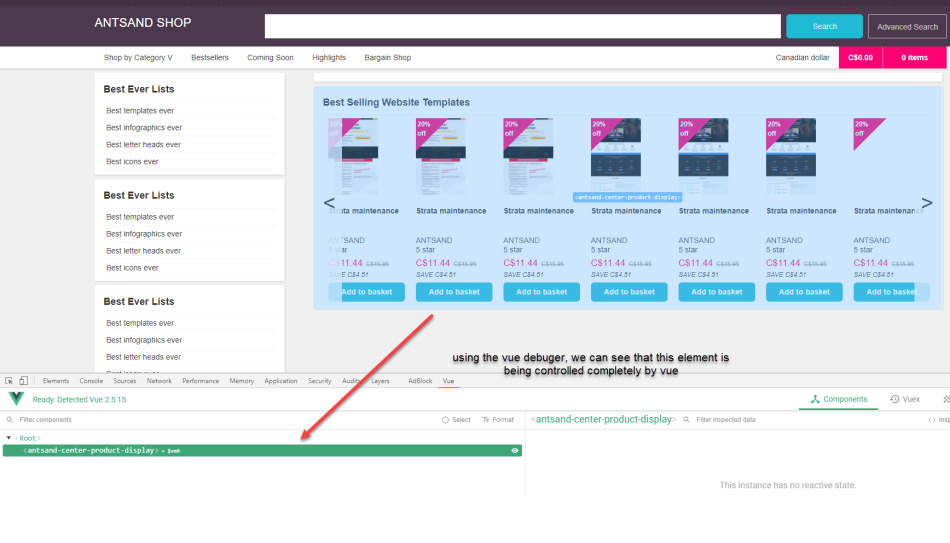
b. Test the changes in the web-browser. And Voila, vue is now integrated with php phalcon!
Conclusion
IN the next article, we will go deep into how to populate this data from a database and using json objects and AJAX with vue and php phlacon. If you have any questions or better ways of working, please comment below. The best comment, I will send you my personal folder structure.
Conclusion:
Please comment below if you have questions, ideas or how you can apply it. At ANTSAND, we apply everything we preach and teach. What we put out is based on our experience, our failures and success. We love to be transparent, as it really brings out the best in us.
The $5 monthly marketing package mentioned in the original article was an idea, not a current offer. Tell me which part of this guide helped and what still needs work.
If you want to read other blogs that might interest you, have a look below.
More Stuff from ANTSAND
Business, UI and UX:
Marketing Made Easy. Ultimate guide to making your business more marketable and profitable
Speed of Implementation for UI and UX startups
8 steps to create world class UI and UX for your startup
12 mindsets and behaviors required for running a lean startup
12 ways to maintain your website and increase sales
My mental maps for success:
39+ mental tools I use to make better decisions
If you are a programmer, you can read more on our Programming blogs:
How to integrate php and vue.js components
Integrating, php, vue and webpack with code examples
Creating restful API's using php and vue